Why bother buying a expensive big security cam when you can buy a cheap DIY board with a tiny cam and make one yourself? We love the esp8266 NodeMCU boards, but its successor the esp32 is so much better! It is faster, has Bluetooth, more features and besides that it is even available with a cam module. So in this article we will setup and configure this ESP board with ESPHome this cam and make it available into Home Assistant. And so imagine the things you can do with it! Build a very cheap spy cam, a door cam that sends a photo when doorbells rings or use your creativity to use it in another use case. Besides using it with the camera you can also connect lots of other accessories to it.
Contents
Specifications of the ESP32 camera
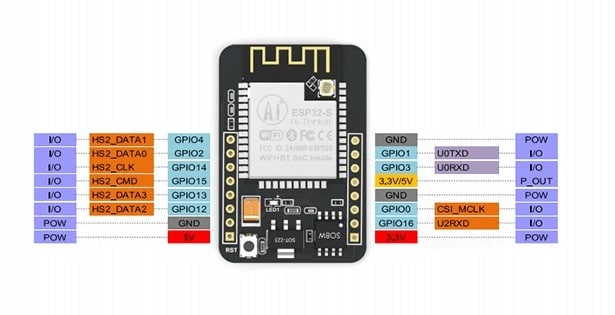
The ESP32-cam is a very nice diy board. Check the pin layout to see the connection possibilities.

Packaging
Product weight: 0.0180 kg
Package weight: 0.0300 kg
Package size: 7.00 x 4.50 x 2.50 cm / 2.76 x 1.77 x 0.98 inches
Does it fit your mailbox?
Yes it does!!
What’s in the box?
1 x Development Board ESP32 Camera,
1 x Camera Module
Features of the ESP32 Camera
- Ultra-small 802.11b / g / n Wi-Fi + BT / BLE SoC module
- Low-power dual-core 32-bit CPU for application processors
- Up to 240MHz, up to 600 DMIPS
- Built-in 520 KB SRAM, external 4M PSRAM
- Support interfaces such as UART / SPI / I2C / PWM / ADC / DAC
- OV2640 and OV7670 cameras with built-in flash support
- Support for images WiFI upload
- TF card support
- Support multiple sleep modes
- Embedded Lwip and FreeRTOS
- Support STA / AP / STA + AP working mode
- Smart Config / AirKiss One-click distribution network support
- Support for a serial local upgrade and remote firmware upgrade
How to integrate ESP32-cam into Home Assistant?
To get the ESP32-cam working in home assistant you need to follow three easy steps:
Install ESPHome, flash ESP and integrate it into Home Assistant.
An ESP device needs firmware software to get it up and running. Commonly used firmware for the ESP are tasmota and ESPeasy. But now there is a new kid on the block: ESPHome. When you run ESPHome on your ESP it becomes available as add-on in Home Assistant. ESPHome works with code to change settings, create possibilities and configure the devices on the different pins. So configure an device, upload (flash) that code and the devices will become available in Home Assistant automatically. Therefor it is not needed to run a separate web server with a GUI like EASYESP.
Build and Flash ESPHome
What to you need?
To flash the first time you need: ESPhome-flasher from https://github.com/esphome/esphome-flasher
airijia made a very good tutorial and a great sample script, watch his video:
Usability
The ESP is a device with endless possibilities. Make a motion sensor, doorbell picture, security camera the possibilities are endless. Check all the compatible sensors switches and options of ESPHome at: https://esphome.io/
pro / cons
pros
- Cheap
- Endless possibilities
- ESPhome > Home Assistant compatible
cons
- No USB connector to Flash
- Does not come with a case.
Where to buy an ESP32-cam?
More info
Official esp32 documentation for ESPHome:
https://esphome.io/components/esp32_camera.html
ESP32-CAM yaml file from Airijia:
https://raw.githubusercontent.com/airijia/esphome-config/master/ESP32/ESP32-CAM.yaml